Mold Remediation Explained

Professional Mold Remediation eliminates the harmful effects of mold by removing, cleaning, and sanitizing affected areas. It also ensures that the problem won’t recur by lowering humidity levels in the area.

The first step is a thorough inspection and assessment. This helps determine the best remediation strategy. Containment is then implemented to prevent mold spores from spreading to other parts of the building. Visit https://utahmoldremovalandremediation.com to learn more.

Mold Remediation

1. Inspection

Mold Remediation specialists inspect homes to identify and address issues that lead to mold growth. Unlike DIY mold removal, this approach addresses the underlying moisture issue so that mold does not return.

During the inspection process, the inspector may use tools like infrared cameras and moisture meters to locate areas of excess moisture in your home. This helps the remediation specialist to understand the extent of your mold problem and create a plan to deal with it.

Infrared cameras and moisture meters can also help the remediation specialist to locate hidden areas of mold growth that are not easily visible to the naked eye. These hidden areas of mold growth are often found in crawl spaces, attics and pipe chases of older homes. It is important to check for these areas of mold as they can be a source of poor air quality and leaks in your building.

If the area of your home where the mold is located is occupied, it is recommended that you notify the occupants about the inspection for their own safety and the health of others. They should be asked to remove items that could block access to the contaminated areas such as furniture or clutter. The occupants of the home should also wear disposable masks and gloves to avoid direct contact with mold.

Once the inspection is complete, the next step is to contain and isolate the affected area. This is usually done by creating an airlock using double layers of polyethylene sheeting and fans to create negative air pressure. This will prevent the movement of mold spores from the clean to the contaminated areas during the remediation process.

2. Containment

When mold is disturbed through cleaning or other work activities, spores are released into the air and can spread to unaffected areas. Proper containment helps to reduce this and protects building occupants.

In addition to sealing off the affected area, other methods of containment can include negative air pressure systems and a misting system to control dust. All workers should use personal protection equipment, including a face mask and goggles. Any vacuum or aspirator used should have a HEPA filter and the exhaust directed to a fume hood or outdoors to minimize spreading the mold spores.

All individuals should be evacuated from the work area if they are unable to safely remain on site during remediation. This includes those with respiratory conditions and weakened immune systems who may be more susceptible to the adverse health effects associated with mold exposure. This should be done with the assistance of trained environmental health professionals, who can ensure that all procedures are followed and that evacuation standards are met.

It is also a good idea to limit the amount of time spent at home during the remediation process, especially if there are significant amounts of widespread mold growth or if you have other medical issues that make it difficult to avoid contaminated materials and surfaces. It is possible to temporarily relocate, such as staying with friends or family, or rent a hotel room during the remediation.

Using moisture permeable materials (such as Tyvek) to cover any collections material that is wet or contaminated will prevent the spread of mold spores during the remediation process. It is a good idea to place contaminated materials that can be discarded in impermeable plastic bags prior to disposal, and to label them before they are placed in the bag. UV radiation/sunlight exposure, used with extreme caution, can also be effective in inactivating small blooms of mold and aiding drying.

3. Removal

When talking with your remediation expert, it is important to be clear on what processes will be used during the mold removal. Different methods are available and your contractor may choose specific procedures based on the size of the affected area, the type of contaminated materials, the cost of removal, and other factors.

In general, a basic mold removal procedure involves cleaning and disinfecting surfaces to kill mold spores. However, this approach is limited because it does not address the underlying issue of moisture and cannot prevent mold from returning if moisture is not properly controlled.

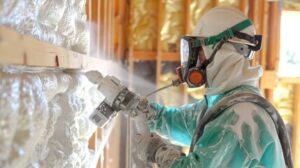
During the cleanup process, the contractor will likely seal off the work area to prevent the spread of mold spores into unaffected areas of your home. This may include using plastic sheeting to block off the work area and tape to seal doors, vents, and windows. A HEPA vacuum cleaner may also be used to clean the surfaces and remove dust particles.

The next step is removing contaminated building materials. This could be as simple as removing drywall in the affected area, or it might require more extensive measures like using blasting equipment to remove moldy plaster and mortar from concrete walls. The type of material removed and how it is removed will affect the amount of airborne spores produced during the process.

If you are unsure whether you or your family will be in the affected area during the remediation process, it is recommended that you vacate the property and seek alternative accommodations. This is especially true if anyone in your household has a respiratory condition or is immunocompromised, as exposure to mold may make these conditions worse.

4. Cleaning

The remediation process will involve a number of steps including assessing, inspecting, and containment. This will allow the professional to determine if your home’s affected materials like drywall, insulation, and flooring can be safely removed. Once all contaminated materials have been removed, the area will be cleaned and disinfected with specialized cleaning agents. This will also involve removing and disposing of any items that have been contaminated by mold. This can include a wide range of items from furniture to rugs. The mold remediation process may also include utilizing air filtration equipment to clean the air in the affected areas and to help prevent spores from spreading.

Depending on the type of mold and the amount of it present, it may be necessary to seal the contaminated surfaces with an anti-microbial solution. This will help to insure that the mold doesn’t return. Moisture control is another important step that will include identifying and fixing the source of moisture in the area. This could include addressing leaks or condensation, and installing dehumidifiers in basements or bathrooms.

It’s important to note that even after the mold is successfully cleaned and remediated, it may still return if the underlying issues have not been resolved. Mold is a symptom of an ongoing moisture problem, and it’s essential that the cause of the mold is addressed in order to avoid future mold growth. Taking action quickly can save you a lot of money and stress in the long run. For this reason, it’s a good idea to contact an experienced mold remediation company to handle the process. This will give you peace of mind that your home is safe for habitation again.

5. Restoration

Once all mold spores have been removed and the affected materials have been cleaned, restoration can begin. This includes repairing or replacing damaged areas and sanitizing the area to ensure that any remaining mold spores can’t regrow. The goal is to restore the property to its pre-mold condition, and this may include recarpeting or repainting.

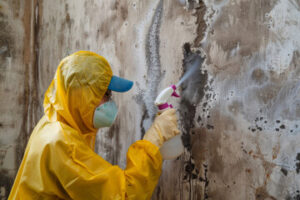
During this part of the process, it is important to protect yourself and others by wearing protective clothing or disposable coveralls. This helps prevent the spread of spores to unaffected areas, and it is also recommended that you use negative pressure to create an airlock in order to limit the amount of airborne spores.

Affected surfaces and materials are then cleaned or if necessary, they’re removed entirely and safely discarded. During this stage, the professionals will usually use antimicrobial cleaners to penetrate and kill any remaining mold spores. This will often be followed by scrubbing with brushes of different sizes, and in more severe cases, sanding or dry ice blasting is used.

In addition to removing visible mold growth, effective remediation should also address the underlying moisture issues that led to the mold growth in the first place. Otherwise, mold will continue to re-grow and can cause serious health issues and structural damage. For this reason, it’s essential to rely on experienced professionals for any mold remediation or restoration work. If you have any questions, be sure to contact your local housing rights groups who can advise you of your options for legal action against a landlord who refuses to take appropriate action to protect their tenants from harmful mold. They can offer free resources to guide you through the process and help you fight for your rights.

Garage Door Repair Basics

Taking care of minor damage can make your garage door last longer. Cosmetic damage like a few small cracks and dents can be repaired fairly easily, as can issues with paint and hardware.

Garage Door

However, more serious damage can cause erratic movement of the door or even pose a security threat. Professional maintenance and repairs are the best way to prevent this from occurring. Contact Garage Door Repair Buckeye AZ now!

The springs in your garage door counterbalance the weight of the door, so they’re under a lot of tension. If the springs break, the door will become unbalanced and could fall down unexpectedly. This is why it’s important to keep an eye out for signs that your springs are wearing out and need to be replaced.

A professional technician can replace your broken springs with care and expertise. They’ll disconnect the opener and manually handle the door, ensuring it’s securely braced before they remove the old springs and install the new ones. Depending on your door type, the replacement process could take 30 minutes to an hour or more. Once the technician has removed the old springs and installed the new ones, they’ll reconnect the opener and conduct a balance test to ensure the door is working properly.

When choosing new springs, look for durable materials with protective coatings that will stand up to the elements. You’ll also want to choose the correct size of springs for your door, so make sure you have the right measurements before starting the installation process. Once you have the basic dimensions of your springs, you can use our Spring Finder tool to find a replacement with similar design characteristics. Simply input the spring’s outer diameter, inner diameter, free length, and force to get started.

To extend the life of your new springs, lubricate them regularly with a silicone-based lubricant. Apply a light coat to each coil and then open and close the door several times to spread the lubricant evenly across the entire surface area. It’s best to do this every 3-6 months, but it’s not a substitute for routine maintenance from a professional. Remember, a garage door is under high stress, so trying to repair, adjust or replace the springs without proper training and tools can be extremely dangerous!

Track Adjustment

Tracks serve as railroad lines for your door, guiding the rollers up and down, making sure the door moves predictably each time. But when they are misaligned, the whole system can become off-kilter and even dangerous. This type of problem typically announces itself with loud, scraping sounds during operation and can also result in visible gaps between the rollers and the track. If the problem is significant, the door may even jump off of its tracks, a dangerous situation that requires immediate attention.

To make a repair like this, first loosen the screws that hold the track brackets to the jamb with a wrench or screwdriver. Loosening the screws allows you to move the bracket in or out to get the track into proper alignment. Once you have the track in place, tighten the bolts to secure it.

Next, identify the cause of the misalignment. This step is particularly important if the issue is with an overhead track, since you cannot work on it with the door raised. Look for signs of a bent track section, including a gap that extends to the sides of the garage door. Minor bending can be straightened with leverage from vise-grip pliers, while significant damage will require professional attention.

Once the damage has been assessed, disconnect the power source to your garage door opener and secure it with clamps or vice grips to prevent it from moving unexpectedly during the repairs. Before starting to work, it is a good idea to put down some old newspaper or other protective covering to prevent any accidental spills or debris from damaging the surface.

Raise the door to the vertical position and check for alignment. You want the rollers to show about a 1/2″ to 3/4″ margin between them and the tracks. If the margin is too small, loosen the track brackets and use a hammer to tap the track into place. Be careful not to apply too much pressure, since a track that is too bent can break under the weight of your garage door. Once the track is in place, tighten the brackets to secure it.

Cable Replacement

Garage door cables support the weight of your garage door and work with springs to lift and lower the door. They can be damaged or worn down by regular use, and if they snap, it can cause significant damage and pose a serious safety risk. Taking care of cable issues with routine maintenance like cleaning tracks, lubricating moving parts, tightening loose hardware, and inspecting the cables regularly can help extend their life. When the cables do wear out, a professional can assess the condition and recommend repair or replacement.

One clear sign that it’s time to replace your garage door cables is a loud “snap” sound when the door opens or closes. In some cases, the cables may simply need to be rewound or realigned. A professional can also advise you on the best type of cable for your specific door.

Besides the obvious visual signs of a cable problem, your door may make other noises as it moves or is operating. Often, this is caused by misaligned or rough tracks that put extra stress on the cables. In these cases, an experienced technician can help by adjusting the track or rollers to fix the issue and reduce stress on the cables.

The other common problem is a lack of balance, which can also cause the door to slam shut or become difficult to open and close. This can be a sign of faulty pulley bearings, which can make squeaking or grinding noises and give off a slight burning smell. Replacing the pulley bearings can help extend the lifespan of the cables.

Replacing a garage door cable is a complex job that requires special tools and knowledge of the system’s design. It’s not something a do-it-yourselfer should try, as the process involves working with high-tension springs and wires. Hiring a professional ensures the job is done properly and safely, which helps avoid future breaks and saves you money in the long run.

Bottom Seal Replacement

The bottom seal, also known as the weather seal or the door sweep, prevents water, debris, cold drafts, and pests from entering the garage. A well-installed seal provides a vital first line of defense against these unwelcome guests, which can cause damage, increase utility costs, and pose health risks for residents. A high-quality bottom seal also helps maintain indoor air quality and reduce energy consumption.

To ensure proper functioning, the bottom seal should be inspected regularly for signs of wear or tear. If the seal is cracked, torn, or excessively worn, it should be replaced as soon as possible to protect the garage from external elements and reduce energy costs. In addition to replacing the seal, homeowners can also perform simple maintenance tasks like lubricating the garage door rollers and tracks to prevent erratic movements and prolong the life of the new seal.

Once the new seal is installed, homeowners should test its functionality by closing and opening the garage door a few times to check for any resistance or gaps. Additionally, they can test the automatic reversing mechanism by placing an object in the path of the door as it closes; the door should automatically reverse upon sensing the obstruction. Once the seal is properly installed, homeowners should apply a silicone-based lubricant to keep it flexible and effective for the long term.

If you’re planning to install a new garage door seal, make sure you have the following supplies on hand:

A tape measure (for measuring the width of the existing seal accurately). Seals come in a variety of shapes and sizes, so it’s important to determine which type is currently in place. For instance, some seals slide into retainers, while others are attached with adhesive strips or screws. It’s also essential to identify the type of channel the seal will be placed in—some are designed for use with specific door types and materials.

Once you have the right size seal in place, carefully cut off any excess length with a utility knife or razor blade. It’s also a good idea to wipe down the channels on both sides of the garage door with a damp cloth or sponge to remove any dirt, dust, or residue that could compromise the installation process and the integrity of the new seal.

Why Insulation Removal Is Necessary

Insulation Removal Perth is necessary to address issues such as leaking walls, mold growth and high energy bills. Old, deteriorated and damaged insulation is not only a health risk but can also compromise the structural integrity of a home.

Insulation

Spray foam insulation is a less invasive option that can be added without the need for demolition. It provides greater energy efficiency and is safer for the environment.

Insulation removal can be a hazardous job. It involves disturbing and stirring up insulation particles that can irritate the skin, eyes and lungs. Proper safety measures ensure that workers are protected and the task is carried out safely. These precautions include proper identification of insulation materials, appropriate clothing and PPE and a well-contained work area.

Suitable clothing includes gloves, eye protection and a dust mask. These help prevent the inhalation of insulation particles and minimize skin irritation. PPE also reduces exposure to any chemicals or contaminants present. These safety measures can be particularly important when working with spray foam or other volatile materials.

A professional insulation contractor will use specialized equipment to remove the old insulation. This will help to avoid damage to the existing structure and protect the home owner from health and safety risks. It will also help to achieve a more efficient and effective outcome.

Before the insulation removal process begins, it is crucial to clear out the attic space of any furniture or other items. This helps create a clear workspace and prevents accidental damage or contamination of other areas of the home. It is also necessary to disconnect any live wires, junction boxes or light fixtures. Failure to do so can result in electric shock or fire during the insulation removal process.

Different insulation types require different techniques to remove them. Fiberglass batt insulation, for example, is typically pink or yellow in color and has a fluffy texture. It is commonly found in walls and attics and requires a special type of vacuum to remove it effectively without damaging the wall or roof. Other forms of insulation, such as cellulose or foam board, are rigid panels that can be cut with tools to remove them from walls.

A professional insulation contractor will take care to avoid electrical hazards by disconnecting any live wires before beginning the removal process. It will also use a hose and a large vacuum cleaner to blow out and collect the old insulation. In addition, it will use a rake and a dustpan to gather the insulation into piles for disposal in waste bags. It will also wear a respirator, protective goggles and gloves to minimize the risk of inhaling insulation fibers or harmful chemicals.

Efficiency

The insulation removal process can be time-consuming and expensive, but it is also essential for achieving proper energy efficiency. Inefficient insulation can lead to higher energy costs and decreased comfort levels in the home. This is why it’s important to hire a professional contractor with experience in the area. A contractor will know how to address any problems that may arise during the removal process and ensure that all steps are taken for a smooth and effective outcome.

When choosing an insulation removal company, it’s crucial to evaluate the contractor’s reputation and customer service rating. Ideally, you should get detailed estimates from multiple companies to assess their services and pricing. Additionally, personal referrals and online reviews can provide valuable insights into a potential contractor’s performance.

During the insulation removal process, it is important to take precautions to protect your health and safety. Using a dust mask or respirator is recommended to prevent respiratory irritation from the fine fibers of insulation. Wearing long sleeves and pants can help reduce skin irritation as well. It’s also a good idea to turn off your HVAC system during the removal process and seal off the room where the work is taking place.

The removal process can be done by hand or machine, and each method has its own advantages and disadvantages. For example, hand removal can be more efficient for some types of insulation, while machine removal is ideal for other conditions. The cost of the process can vary depending on the size and condition of your home, as well as how much insulation needs to be removed.

Before starting the insulation removal process, make sure you have all necessary tools. This includes safety goggles, a mask, and gloves to protect your face and body from airborne particles. It’s also helpful to have a dustpan, a vacuum with a HEPA filter, and sealed bags for disposal. In addition, a ladder is essential for accessing the attic or crawl space. It’s also a good idea not to overwork yourself during the removal process, as high temperatures can cause heat exhaustion and lead to dehydration.

Environmentally friendly disposal

Insulation is a large waste product that requires proper disposal to prevent environmental hazards and health issues. It’s best to hire a professional service that offers environmentally friendly insulation removal, as they are well-versed in local regulations for the safe disposal of hazardous materials.

This includes following strict protocols for containing and removing materials, as well as thorough cleanup and decontamination afterward. This helps to reduce exposure and improve air quality, especially if the insulation is contaminated by mold or pests. Professionals will also ensure that the work area is fully sealed off and protected, to minimize exposure to particles and fibers.

In addition, if the old insulation contains asbestos or other hazardous materials, professionals will use containment methods to protect themselves and others in the vicinity while working on the job. This may include sealing off vents and covering furniture or other valuable items. They will also use specialized equipment to contain dust and other particles, as well as vacuum up the debris.

If the old insulation is in good condition, it can be repurposed or recycled. This is a green option that reduces waste, as well as the need to import new insulation from overseas. It can also help to lower your energy costs.

However, if the insulation is damaged or moldy, it’s important to have it removed and replaced as soon as possible to avoid damage to the building structure. In addition, contaminated insulation can be a source of allergens that affect indoor air quality, so it’s important to replace it promptly.

Fortunately, many insulation companies offer recycling options for fiberglass and cellulose insulation. They follow strict guidelines for environmentally friendly disposal, ensuring that the insulation is reused or repurposed rather than disposed of in landfills.

Insulation is a common waste material, but it’s also an effective insulator that can save you money on your energy bills. Using the right insulation can save you hundreds of dollars in heating and cooling costs, so it’s worth the investment. However, improper installation or disposal of insulation can lead to mold, rodents, and structural damage. So, it’s always better to leave this job to a qualified professional, who can provide safe and environmentally friendly disposal.

Post removal inspection

Insulation that is not in good condition can compromise indoor air quality, increase energy costs, and create a breeding ground for pests. It can also become brittle and disintegrate due to age or moisture damage. In addition, it may no longer meet current energy standards. In these situations, it is important to take proper post removal inspection measures to avoid further problems.

The first step is identifying the insulation type, which can be done with an attic inspection. This is necessary because it will help determine the safest method of removal and disposal. It will also help you decide whether to do the removal by hand or machine. The type of insulation can affect how long it takes to remove and how much the project will cost.

Once the type of insulation is determined, the next step is to create a removal plan. This will include the type of equipment, disposal methods, and potential hazards that may exist in the attic. A professional contractor will be able to assess the situation and develop a safe and efficient removal plan. This will minimize disruptions to your daily routine and help you save money.

Insulation removal is a significant job that requires extensive knowledge and skill. It is also a dangerous job and can pose health risks. This is particularly true if the insulation contains hazardous materials, such as asbestos or vermiculite. In addition, it is essential to use the correct PPE when working with insulation, including safety goggles and a respirator mask.

After the insulation is removed, the attic should be inspected for any signs of mold or water damage. It is also a good idea to have an expert perform an energy audit to identify leaks and check for other areas of concern. This will help you determine if your insulation needs to be replaced or not.

Hiring a professional for insulation removal is the best choice for homeowners. They will be able to assess the condition of your insulation, provide recommendations for improvements, and complete the job safely and efficiently. They will also ensure that all materials are disposed of according to local regulations, especially if they are considered hazardous. In addition, they can help you find new insulation that will improve your home’s energy efficiency and comfort.

Faucet Repair – How to Fix a Leaking Handle

Faucets waste a lot of water and money. The good news is that most problems are fixable. Whether it’s a leaking handle, a squeaky handle or internal parts that are worn out, you can usually repair them yourself. Contact Faucet Repair Houston for professional help.

Faucet Repair

Start by turning off the water supply to the faucet. Turning it off before you work will prevent water from dripping down your wall.

A small drip in a faucet can add up to a lot of wasted water over time. Even a single drop per minute can waste as much as 300 gallons annually. You can save both money and water by taking care of leaks as soon as you notice them. Shut off your water supply valves, which are usually located underneath the sink. Once the water is shut off, remove the handle and disassemble the faucet. Before you begin, place a towel in the drain to catch any parts that may fall down the pipe while you’re working.

The most common cause of a dripping faucet is a worn out or damaged washer. This simple component creates a seal between the handle and the valve stem, but it can become clogged with mineral deposits or worn out from constant use. Replacing the washer is a relatively easy fix, but you will need to know what kind of faucet you have to find the right washer size. You can buy a compression faucet washer kit with different sizes, or you can just purchase a washer at your local hardware store.

Another common cause of a leaking faucet is a corroded valve seat. The sediment that builds up inside this component can wear down the surface, creating small crevices that allow water to seep through and cause a leak. To prevent this, you’ll need to replace the valve seat quickly before it causes further damage to the faucet.

Some types of faucets are more difficult to take apart than others, but even the most complicated models can be repaired with a little patience and some basic tools. After turning off the water supply, carefully remove the faucet handles and securing screw. Once the handles are removed, loosen the packing nut beneath the spout with a wrench. Protect the nut with tape to avoid scratching the metal. This nut may unscrew in either direction, so try turning it the other way if it doesn’t budge on the first attempt.

Once the nut is loose, you should be able to pull the valve stem out of the spout and inspect the other components. If any rubber O-rings are worn or deteriorated, it’s important to replace them with the proper size to prevent future leaks. You should also examine the valve seat and washer for signs of wear or corrosion. Once you’ve replaced the necessary parts, reassemble the faucet and turn on the water to test your work. Remember to never overtighten screws or nuts. Doing so can damage or bend delicate parts, and it’s very likely to lead to other problems down the road.

Repairing Cartridge Faucets

Cartridge faucets are a form of washerless faucet that uses a cartridge to control water flow and temperature. The cartridge opens and closes pathways to direct the water stream, and can be adjusted for fine tuning. Cartridges are found in both single-lever and two-handle faucets, as well as shower faucets.

The average cartridge lasts between 15 and 20 years, although the lifespan can be reduced by poor maintenance or hard water. A cartridge that’s worn out will usually give you warning signs, such as a leaking handle or faucet, or difficulty controlling the temperature of the water. Identifying problems with your cartridge early can help prevent water waste, more extensive repairs, and costly energy bills.

In most cases, it’s best to replace a faucet cartridge instead of repairing it. A new faucet will also be more water efficient than an older one, saving money on your energy bill. If your faucet is 15-20 years old, or if you experience recurring problems, it’s probably time to consider full replacement.

Before attempting to repair or replace your faucet cartridge, shut off the water supply. You’ll need to find the shutoff valves under your sink, and then turn them off until they’re completely closed. It’s also a good idea to shut off the main water valve in your home if you have one.

Once the faucet is turned off, you can start working on it. First, remove the handle by unscrewing the screw or lever that holds it in place. Then, use an adjustable wrench to loosen the retaining nut and pull out the old cartridge. Make a note of how the cartridge is positioned, as you’ll need to install the new one the same way.

Once you have the new cartridge, screw it into the faucet body and tighten the retaining nut. Then, reinstall the handle and decorative cap (if applicable). Turn the water supply back on, and test your faucet for proper functionality. If you have any trouble, contact a professional plumber for assistance.

Repairing Ceramic Disc Faucets

One of the newest forms of faucets available, ceramic disc cartridges are easy to operate and offer great reliability. They work by mixing hot and cold water inside a cartridge which contains a series of ceramic discs that move up and down to control the flow of water as well as a side to side movement to control the temperature. The cartridge also has a spring and neoprene seal which, like any other part of the tap, will wear out over time.

To fix a ceramic disc faucet, first remove the handle by unscrewing it from the tap. You may need to use a blade, such as a Stanley knife to remove the button that marks Hot and Cold from the tap handle. There is often an Allen Screw holding the handle in place underneath, loosen this by turning it anticlockwise and then pull the handle from the tap.

You can then see the ceramic disc valve, and if it isn’t leaking then it shouldn’t need any repair work. However, if it is not operating correctly then you need to replace the spring or the neoprene seal. These parts are quite cheap to purchase, so it shouldn’t be too much of a problem to do this.

Ceramic disc faucets work differently from other forms of cartridge faucets as they do not have a washer to compress. When the lever is turned, a quarter turn of the shaft aligns two ceramic discs which allow the water to flow through the tap and when the discs are no longer aligned the tap stops working. This system has a number of benefits including less friction and reduced wear.

The ceramic discs are made from long-lasting materials and therefore generally do not need replacing, but over time they can suffer from mineral deposits and build up. This is especially the case in areas with hard water where calcium and other minerals can cause a build-up that can make it difficult for them to function as effectively.

You can solve this issue by using a small amount of vinegar and water to clean the ceramic disc, or you could remove it from the cartridge and soak it in a solution of equal parts of white vinegar and water for 30 minutes. You will need to rinse the cartridge after this and then dry it thoroughly before re-installing it.

Repairing Single-Handle Faucets

Whether it’s a single-handle or double-handle faucet, the most common cause of leaks at the end of the spout is that one of the cartridges has worn out. The good news is that replacing the cartridge is a relatively simple task for any homeowner. Before you start, though, make sure that you shut off the water supply valve underneath your sink by twisting it clockwise. Also, plug the drain with a rag or towel to prevent small parts from falling down the sink drain. Finally, put a cloth or rag on the bottom of your sink to protect it from scratches while you’re working.

You’ll also want to have a few tools on hand, including an adjustable wrench or screwdriver and a pair of pliers. It’s a good idea to wrap your wrench or screwdriver in a towel or piece of duct tape to avoid scratching the finish on your sink. If you’re working with a chrome or bronze finish, be especially careful not to scratch it.

After you’ve turned off the water, remove the handle by unscrewing a set screw with a screwdriver or hex wrench. Once the handle is off, you’ll have access to the cartridge and the O-rings and seals inside. If the O rings are leaking, you can usually pry them out and soak them in white vinegar to recondition them.

Once you’ve replaced the O-ring and washer, reassemble the faucet by screwing in the new cartridge. Be sure to reassemble the handle with its decorative cap, if applicable. Turn on the water and test for leaks. If you still have a leak, repeat the process or contact a professional.

Stylish and Timeless

Double-handle faucets are sleek, timeless fixtures that look elegant in any home. They’re easy to operate with the use of one hand, which can be useful for people with arthritis or limited mobility. They also provide more precise temperature control than single-handle faucets. However, double-handle faucets can be more expensive than single-handle models.

Leaky, drippy faucets are not only annoying, but they can lead to costly water waste and damage your property over time. Inspecting and maintaining your faucets on a regular basis can help you spot problems early and save money in the long run.