How to Repair Cracks in Concrete

Cracks in concrete can be a safety hazard, cause water penetration, and lead to mold or mildew. It’s important to get any cracks repaired as soon as they are noticed to avoid further damage.

Concrete

Eco-efficient repair methods have to minimize resource use and GHG emissions throughout the life-cycle of concrete. They also have to achieve the desired performance level in terms of durability and costs. For professional help, contact Concrete Repair Morgantown WV.

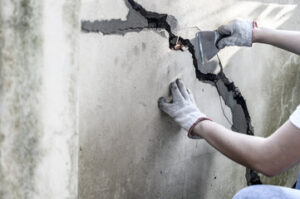
Concrete cracks in slabs, driveways, sidewalks, patios and pool decks are common and relatively easy to repair. However, it’s important to understand how the crack forms and what the cause might be before you start repairing it. In some cases, it’s necessary to hire a professional concrete contractor to assess the situation and determine the best method of repair.

First, make sure the crack is clean. Scrub the crack with a wire brush and vacuum up all the debris. This step is crucial in ensuring that the crack filler will adhere to the concrete.

Next, apply a layer of bonding adhesive to the surface of the crack. This helps ensure that the crack filler will adhere to the existing concrete and prevents water from seeping into the crack and further deteriorating it.

After applying the bonding agent, let it dry. You can speed up the drying process by using a blow dryer. It is also a good idea to cover the area with plastic to protect it from stains and other damages while the concrete is repairing itself.

For small cracks, you can use a concrete caulk. Most of the time, these products are used in exterior applications like driveways and walkways, but they can be used indoors too (garage floors and basements, for example). The most important thing to remember about concrete caulk is that it doesn’t actually fix cracks; it just creates a seal on the tops of the cracks to keep water out.

For larger cracks, you will need a more substantial concrete patching product. This can be an epoxy or latex-based product, depending on the manufacturer’s specifications. The key is to follow the directions closely. Some of these products require mixing the components before application and others must be troweled into place. Once the product is applied, it will need to cure for a few days before the surface can be walked on.

Reinforcing Cracks

If a crack in concrete is structural in nature, it may be necessary to strengthen the structure to prevent further damage. Structural repairs involve placing additional steel in the structure to support loads that would otherwise cause further cracking and deterioration. The steel is anchored into the concrete with epoxy or grout, and is then used to support the additional load, thus relieving the cracks in the concrete.

When installing a reinforcement system it is important that the correct size of reinforcing bar is used. This is critical for achieving proper strength and durability of the new structure. In addition, it is imperative that the concrete is well cleaned before placing the bars into it. This will ensure the integrity of the repair and that it is not contaminated with unwanted substances.

In most cases, the failure of a concrete repair is due to the incompatibility between the repaired surface and the host concrete. This is caused by a number of factors, including chemical and physical interactions at the interface between the repair material and the host concrete. The most common incompatibility is a difference in shrinkage rate, which can lead to debonding and failure of the repair material.

Another way to increase the durability of a concrete repair is to use polymer-modified cementitious mixtures. This is accomplished by mixing dispersed or re-dispersed organic polymers into the hydraulic cement during its mixing. The polymers then coalesce into a co-matrix with the hydrated cement, significantly improving the flexural strength, bond strength, abrasion resistance and permeability of the repaired concrete.

One of the most common and effective methods of repairing cracked concrete is to “stitch” the crack. This is done by drilling an entry and exit hole across the crack and then running a series of U-shaped metal staples into it, anchoring them firmly in place with an epoxy or grout-based system. This is an efficient, cost-effective and long-lasting method of repairing concrete.

While increasing the durability of a concrete repair is important, it is also important to keep in mind that a significant portion of concrete repairs are carried out due to deterioration problems in existing structures. These repairs have a direct impact on the environment through depletion of natural resources and massive carbon dioxide emissions and inert waste production. Engineers need to focus on designing eco-efficient repair systems that attain specified performance levels while minimizing environmental impacts.

Filling Cracks

Concrete cracks are often caused by uneven drying, shrinkage and temperature changes. If not repaired promptly, they can lead to water seepage and further damage. There are several different approaches to concrete crack repair, depending on the overall goals of the project. Some approaches focus on structural bonding and others focus on stopping water flow. In either case, proper preparation of the existing concrete is essential. This includes removing any unsound concrete and cleaning the surface.

If the goal is to create a structural bond, epoxy injection may be the best option. This is a labor intensive process and requires the services of a skilled contractor. However, it can be very cost effective if the project is large enough.

For cracks that are 1/8 inch wide or narrower, the simplest approach is to fill them with a concrete patching product. This material is available in a variety of mixes, each formulated for a specific type of crack and cure time. Follow the directions on the product you select for your project.

Before you apply the concrete repair product, it is a good idea to make sure the crack is clean and dry. Generally, a mason’s trowel or putty knife will work. A stiff brush or wire brush can help loosen up any debris in the crack.

You will also need to prepare the area around the crack. This means spreading a tarp beneath the work area, if necessary, to facilitate cleanup and protecting the surrounding concrete from dust and dirt. It is also a good idea to wear appropriate protective equipment, such as gloves and safety goggles.

The next step is to “back-fill” the crack with a filler product. This will help prevent the concrete patch from settling into the crack and creating more problems. Backer rod is available in a range of sizes, so select a diameter that is slightly larger than the width of the crack you are repairing.

Finally, pour or trowel the concrete patching compound into the crack, again following the instructions on the product you choose. After it dries, smooth the crack with a masonry float, sandpaper or a wire brush to ensure that the repaired area blends in seamlessly with the surrounding concrete.

Repairing Leaks

Leaks are a major source of concrete damage and must be repaired promptly to protect structures and minimize environmental impacts. This type of repair requires a thorough inspection including visual inspection, pressure testing and acoustic monitoring to identify the location and extent of the leaks.

Once the leaks have been located, it is important to prepare the concrete surface before applying a repair material. For concrete surfaces that are not prone to movement, a simple concrete patching material can be used to seal the area around the leak. For concrete surfaces that are prone to movement, a penetrating concrete sealant may be required to ensure the integrity of the structure.

A common cause of slab leaks is aging plumbing lines that are susceptible to corrosion, shifting soil conditions and chemical reactions with metals in the soil. The first step in repairing slab leaks is to complete a comprehensive inspection and evaluation of the plumbing system.

After the leaks are identified, they can be repaired using a variety of methods. For small cracks and localized leaks, surface patching can be a quick and cost-effective solution. For larger slab leaks, epoxy injection is a popular technique that penetrates through the cracks to provide a watertight seal.

For tile tanks and piping, a shotcrete process is often used to repair leaks in the tank walls. This method can be highly effective, especially when combined with an acoustic monitoring program to identify delaminated areas that send back dull hollow sounds rather than the hard ring of sound concrete.

For broader concrete repairs, geopolymer concretes are an option that offers many environmental benefits. These new sustainable concrete materials are produced by combining alumino-silicate components such as fly ash and metakaolin with an alkali activator such as sodium hydroxide. These materials offer the potential to significantly reduce greenhouse gas emissions, compared with traditional concrete and cement products.

Whether you are repairing concrete cracks, waterproofing slabs or restoring concrete tanks and other infrastructure, it is critical to work with a professional concrete contractor that has the right equipment and training to get the job done correctly. Not only will a qualified concrete contractor save you time and money, but they will also use high-quality materials that are guaranteed to last. They will also provide a warranty on their work and have insurance to protect you in case of any accidents or injuries that may occur during the repair process.

Rent Self Storage Units For Convenience and Security

Using self storage units allows businesses to have their own mini-warehouse spaces at a fraction of the cost of renting property. Some facilities even provide security controls.

Self Storage Units

A self storage unit is a convenient and economical way to store extra belongings. Whether you’re a small business owner who needs to offload inventory or files, or a homeowner who is trying to stage your home before selling it, a storage unit can be an ideal solution. These units are usually accessible 24 hours a day and offer plenty of space. They’re also much cheaper than renting a larger office or warehouse space. Contact Storage Bay for more details.

Depending on the size of the unit you rent, facilities typically have climate control options to protect your belongings from extreme temperatures. They can also provide dollies and other moving equipment, and they may sell retail locks and boxes to their clients. Some facilities even offer online client portals, so you can manage your rental anytime.

Self storage facilities are often located in densely populated areas because residents need to store items until they find a new place to live. Some tenants are simply downsizing from a large home to a smaller apartment, while others are waiting for a more permanent move. The facility’s location can have a significant impact on the unit price. It’s also important to consider the amount of competition in a given area.

Many storage facilities require customers to sign a long-term lease. However, some facilities have switched to month-to-month leasing with no upfront fees. This allows the customer to move on when the time comes, without having to worry about the cost of an early termination fee.

If you’re looking to open a self-storage facility, it’s a good idea to write a business plan. This document outlines the details of your business, including the location, pricing, product offerings, and financial projections for several years. Having a business plan will help you realize your goals and deal with any challenges that might arise. Besides, most lenders will want to see one before extending a loan.

Creating a promotional website for your facility is an excellent way to attract and retain customers. A well-designed website makes it easy for consumers to reserve a unit and pay for it. It’s also easier to collect payments online, so you can save on collection calls and administrative costs.

Security

Self storage units are becoming increasingly popular, and many people are concerned about the security of their belongings. While these units are usually insulated from the elements, they can be vulnerable to theft and damage. The good news is that most companies take a number of measures to prevent theft and damage from occurring. This includes installing security cameras and using advanced technology to monitor and track activity. In addition, most companies require renters to lock their unit door. This ensures that only the tenant can access their items.

The storage facility must also provide adequate lighting. Thieves are more likely to avoid a well-lit area, and lighting can help deter them. In addition, a good lighting system can make it easier for people to navigate the facility at night. This can be done by installing lights that are activated by motion sensors.

A good storage facility should have cameras that provide surveillance of all areas of the property. This is especially important for larger facilities with a lot of different units. Some of these cameras may be mounted on poles, while others can be installed inside the facility. The cameras should be able to capture the entire area, and some may be equipped with video analytics that can detect any unusual activity.

Some companies also use drones to monitor the premises. This type of surveillance provides an overhead view of the property, and it is often more effective than a traditional camera. In addition, drones can be equipped with AI technology that can identify potential threats.

In addition to implementing security systems, the company should have a policy in place that outlines their responsibility for stolen items. This should be included in the rental contract, and it should include details about how the company will handle these situations. It is also important to pay attention to pricing, as unscrupulous companies have been known to advertise low prices and then hike them up after a renter signs a lease.

Despite the fact that there are many benefits of renting a storage unit, it is important to do some research before signing a lease. It is a good idea to ask the company about its policies regarding theft and damage, as well as its location. This information can help you decide whether the storage unit is right for you.

Affordability

Storage unit rates are surprisingly affordable. For example, a 10×10 unit can cost as low as $84. These units are often located close to home or work. They are also well-lit and insulated, with 24-hour surveillance and gate access. There are a variety of unit sizes available as well, so you can easily find one that fits your needs. You’ll need a government-issued form of ID when you rent a unit, including a driver’s license, passport, state ID or military ID. You’ll also need to sign a binding storage agreement or contract, so be sure to read it carefully before signing.

Aside from the obvious benefits of having extra space for items you don’t have room for in your home, storage units are also a practical solution for temporary situations. For instance, if the new home you’re moving into isn’t quite finished yet, or if your vacation plans are unexpectedly postponed, a storage unit can hold the items you need until you can figure out what to do with them.

Similarly, small businesses may find themselves needing to store inventory, archives and other business materials that would otherwise take up valuable office or warehouse space. In such cases, a storage unit can provide a climate and environment controlled “mini-warehouse” at a much lower cost than renting larger premises.

If you’re serious about decluttering, a storage unit can be an effective way to keep yourself on track. Once you’ve moved the clutter from your home and into a storage unit, it’s out of sight and out of mind. That means it’s far less likely you’ll ever go back and deal with it again, so it won’t pile up over time.

For items that don’t have a place in your home or office, you could donate them to charity, sell them, or just throw them away. But, before putting your items into storage, make sure you’ve truly weeded out the junk. This can be a difficult task, especially for those who have sentimental attachment to items. Spending a weekend getting the useless stuff out of your life is a good idea if you want to avoid wasting money on storage units.

Flexibility

Self storage facilities can accommodate your unique needs by providing various unit sizes, a wide range of amenities, and flexible rental terms. These measures can help you save time and money when looking for the right space to store your items. You can even rent a unit for as little as one month without having to sign a long-term lease agreement. In addition, you can use a lock for your unit so that only you have access to your belongings.

When choosing a storage unit, make sure that it is big enough to hold all of the items you plan to store. Measure your largest furniture pieces and boxes to determine the size of the storage unit you will need. It is a good idea to overestimate slightly because you may be able to downsize later if needed. Additionally, the facility’s location should be convenient for you to get to. If you need to access your items often, a storage facility that is close to your home or office will be best.

A storage unit is also a great option for students living in limited spaces. It can save them from having to transport their belongings back home for the summer break. It can also help them declutter their rooms and prevent clutter from building up. Lastly, it is an affordable solution for businesses that need extra office space to expand their operations.

Unlike traditional office space, self storage units offer flexibility in renting terms. You can rent a storage unit for as long or short a period as you need it, which is perfect for small business owners. This can be a significant advantage for companies that are growing quickly or just starting out.

While most storage facilities work in the same way, there are some that have better customer service and more security measures than others. You can find out about the services offered by a specific storage facility by searching online reviews. You can also compare the prices of different storage companies in your area to see which one offers the best deals.

Why Landscaping Matters: Enhancing Your Outdoor Space

Studies show that spending time in nature helps lower stress levels and promote feelings of happiness. Landscaping can help bring these benefits to your own yard through carefully planned, maintained plant and hardscape choices.

Landscape themes can be formal, like French country, or more informal, such as rustic or traditional. Choosing a theme is an excellent way to guide your choice of plants and hardscape materials. Visit https://www.primecutlawnky.com/ to learn more.

Landscaping

1. Aesthetics

As you may know, there are many ways to make your yard more beautiful. You can add flowers to your garden, install a water feature or even plant trees. You can also create a more harmonious landscape by planting native plants that fit in with your natural surroundings. However, the most important aspect of aesthetic landscaping is to strike a balance between your personal desires and ecological concerns.

Aesthetic landscaping is the process of creating a visual experience that resonates with people. It involves choosing plants and other elements that fit in with your surroundings and reflect the overall environment. It can involve a variety of factors, including form, color, texture, and flow. There are many ways to achieve an attractive landscape, from shady nooks to vibrant flowers and well-planned patios. You can also add a water feature to your garden, which will bring in more wildlife and create a relaxing ambience.

Many studies have investigated the causes of people’s satisfaction with landscapes. In general, it is believed that people are satisfied with their landscapes because they provide a sense of balance and harmony. The main theories of landscape preference are based on evolutionary or socio-ecological approaches. Some researchers have argued for an innate preference hypothesis (Ulrich, 1991) and others have developed an information processing theory of landscape aesthetics (Kaplan & Gimblett, 1985).

You can use your own personal preferences to determine your landscape style. You can find images of different styles on social media or download an app that helps you plan your own outdoor space. It is important to understand the principles of a design, such as balance, proportion, unity, and emphasis.

2. Functionality

Landscape design is a creative and flexible process that aims to create functional outdoor spaces. It is used in residential and commercial settings, such as gardens, parks, courtyards, and corporate campuses. It incorporates various elements to improve a space’s visual appeal and functionality, including plants, water features, and hardscapes.

Landscaping improves a property’s overall value by increasing its curb appeal and creating a comfortable place to relax or entertain guests. It also helps conserve water, reduce soil erosion, and improve air quality by filtering pollutants. In addition, it can boost a property’s energy efficiency by providing shade and insulation.

Many factors affect the structure and function of landscapes, including soil type, climate, terrain shape and elevation, and bodies of water. These factors can have both positive and negative impacts on a landscape’s ecosystem services, the benefits that natural areas provide to humans.

The most important aspect of landscape function is the interconnectedness of the spatial elements that comprise a landscape. This interconnectedness can be influenced by the presence of different plant types, as well as human activity, which is why it’s important to consider the context and scale of the landscape when conducting landscape research.

The landscape of a region is also impacted by its climate, with mountain landscapes needing trees and plants that can survive in harsh conditions, while flat landscapes require drought-resistant vegetation. Additionally, the landscape of a region can be influenced by its geography, with coastal regions requiring salt- and drought-tolerant vegetation. In addition to this, landscaping can help prevent soil erosion by planting trees and shrubs that will stabilize the ground and prevent mudflows in severe weather. This can also protect the surrounding environment and wildlife, as erosion can cause pollution and clog rivers and streams, killing fish and other species.

3. Health

Landscapes add beauty and value to homes and businesses. They also provide many health benefits. A well-maintained landscape prevents soil erosion and water runoff, protects buildings from wind damage and ice, provides oxygen, reduces noise, protects wildlife habitat, reduces air pollution and more.

Research has shown that even looking at a landscape outside your window can improve your mood and help you focus. Studies have found that people with greater access to nature and green spaces report lower stress, depression, anxiety and fatigue.

A beautiful landscape can help you relax and unwind after a long day. It can offer a place to enjoy the outdoors with family and friends, and it can be a sanctuary to escape from societal pressures and stresses.

Landscaping Provides Shade

On a hot summer day, trees and impeccably mowed lawns create a cooling effect. These natural air conditioners keep outdoor temperatures 6-degrees cooler than the surrounding area, allowing your home or office to stay comfortable without using as much energy.

In addition to lowering temperature, shaded lawns and plants absorb pollutants in the air. For example, ozone and nitrogen oxides are absorbed by tree leaves, while dust and smoke particles are captured by grass and shrubs. Cities can significantly improve their air quality by adding more landscaping with plants that can filter the air.

Landscapes can also help reduce noise levels by acting as sound-dampening barriers. For instance, a thick row of tall sycamore trees in a residential yard can cut down noise by 20 to 30 percent compared to hard surfaces like sidewalks and driveways. Moreover, a well-designed and maintained landscape can block the view of busy streets or neighbors’ yards, making a space more private.

4. Durability

Landscaping can be quite costly, but a well-kept yard can also increase a home’s value. Prospective buyers are often willing to pay more for a property with professional landscaping in both the front and back yards.

Landscaping includes both softscape and hardscape elements. Softscape refers to the living things in the garden like trees and flowers, while hardscape includes non-living objects, such as pavers, rocks and other decorative features. Hardscaping includes walkways and patios, gazebos and covered decks.

Durability in landscaping depends on the materials used and how they are treated to resist wear and tear. For example, aluminum is a good material for outdoor furniture and window frames, but it does not hold up as well when used for landscape edging. Steel is a much stronger and more durable option for landscape edging, and it can stand up to the weight of a car without denting or bending. Concrete is another very durable material that works well for pathways and driveways.

The color of the landscape also contributes to its durability. Warm colors like red and yellow create excitement and draw the eye, while cool colors like green and blue offer a tranquil feel. Some plants and flowers are also naturally resistant to weathering, rusting and insect infestations. Landscaping professionals are always looking for new options for clients, including a Japanese tactic from the 1700s known as shou sugi ban, which involves burning the surface of wood to make it more resilient.

Cities are notorious for becoming hot and creating what’s called a heat island effect, meaning that the temperature is several degrees higher than in rural areas. Landscaping helps mitigate this problem by adding shade and reducing the need for air conditioning. Trees in particular act as nature’s air conditioners, and they can reduce the temperature of a backyard by up to 6 degrees on a summer day.

5. Value

In addition to a more pleasing environment, landscaping can add value to real estate. Whether it’s a garden, trees, bushes or flowers, well-maintained landscaping can increase property values by 10% to 14%. Curb appeal is a major factor when it comes to impressing potential buyers, so keeping up with the latest landscaping trends can help you sell your home faster.

Landscaping is also a great way to improve the overall safety of your property. Properly placed plants and shrubs can deter intruders and unwanted guests from entering your property. In addition, landscape lighting can be a valuable tool to keep your property safe at night. If you’re unsure of how to install or use lighting for your landscape, we recommend reaching out to a professional for guidance.

Lastly, many studies have shown that being surrounded by greenery can have positive physical and mental health benefits. For example, walking through a natural setting has been shown to lower blood pressure and improve attention and memory. The presence of plants can also reduce air temperatures by shading objects that commonly absorb heat, such as buildings and pavement.

With all these benefits, it’s no wonder that homeowners and commercial property owners are investing more and more in landscaping services. While a kitchen or bathroom remodel may be high-cost, the return on investment for landscape projects is usually higher than other renovations. Plus, the value of your property is constantly increasing as you maintain and add to your landscaping over time. So if you’re looking to boost your property’s value, consider hiring a landscaping company. The right company can design a custom outdoor space that’s perfect for your needs and adds value to your home or business.

Cabinet Refinishing – Give Your Kitchen Cabinets a Facelift

Cabinet Refinishing Sacramento is the cheapest way to remodel your kitchen cabinets. It involves sanding down your cabinets and painting them. It’s also an eco-friendly option.

Cabinet Refinishing

While refinishing is cheaper than refacing, it’s limited in its scope. It won’t allow you to change your door style or wood species. It’s also not suited for painted or laminate cabinets.

Cabinet refinishing is an affordable way to give your kitchen a facelift. It involves sanding down the existing cabinetry and applying a new finish to it. The cost of this project is usually about 30% to 50% less than replacing the cabinets altogether. The process is less invasive and can be completed in a week. Depending on the type of finish chosen, it can also be an eco-friendly option for homeowners.

The most important part of a cabinet refinishing job is the prep work. You will need a screwdriver or drill to remove the hardware and hinges from the doors and drawers. It is helpful to label each piece of hardware in a Ziploc bag so that you know what goes with each door or drawer when you are ready to put them back together. You will also need a tack cloth to wipe away any remaining bits of dust from the surface.

Once the surfaces are clean and free of dirt, you can start sanding the cabinetry with a foam sanding block. This will create a profile that helps the primer adhere to the surface. Make sure to sand to the bare wood, but don’t overdo it or you could end up with a rough finish that will not look good. Be sure to use a tack cloth after sanding to get rid of any dust or dirt and vacuum the cabinetry as well.

After the sanding is done, you can apply the first coat of paint. Depending on the color, you may need more than one coat. Be sure to wait for each coat of paint to dry before applying the next. Using a mini roller is a great way to achieve a smooth coat of paint.

Whether you’re looking to improve your home’s interior design or simply want to update the appearance of your kitchen, refinishing your cabinetry is an economical and environmentally friendly solution. However, it’s important to remember that cabinet refacing is a more extensive remodel than refinishing, and it can be expensive. You should always consult a professional to decide what’s best for your kitchen.

Time

Cabinet refinishing is a fast and affordable way to update your kitchen. However, it takes time to get the job done right. If you hire a professional, they will save you a lot of time and effort because they will know the best techniques. They will also be able to spot problems and recommend long-term solutions. However, if you want to do the work yourself, it will take a few days to a week.

The first step is to remove all the hardware from the cabinets. This will take a few hours. Then, the cabinets will be lightly sanded to ensure that the new finish adheres well. This will take another 2-4 hours. After the sanding, you will need to prime the surfaces to ensure that they are ready for the paint. The primer will also help to reduce the amount of paint required and ensure a smooth surface.

Once the primer has dried, you can start painting the cabinets. It will take a few hours for each coat of paint to dry, so be sure to allow sufficient time between coats. You will also need to wait for the paint to fully cure before reattaching the doors and hardware.

Depending on the condition of your cabinets, you may need to use chemical strippers to get them ready for refinishing. This will take several hours and require significant ventilation. You will also need to sand the raw wood thoroughly to remove any raised grain and traces of old finish. Once the sanding is complete, you will need to apply a coat of clear varnish to protect your cabinets from water damage and scratches.

It is important to note that refinishing your cabinets does not fix structural problems. If your cabinets are warped or cracked, you should consider refacing or replacing them instead of refinishing them. Also, it is important to choose a high-quality paint to avoid peeling or chipping. A professional painter will be able to provide a long-lasting and attractive finish that will last for years. In addition, a professional will be able to handle the project safely and efficiently.

Materials

The material you choose for cabinet refacing is essential to the success of the project. There are several options to choose from, including solid wood, melamine, laminates, and thermofoil. Each has its own advantages and disadvantages. In addition to aesthetics, durability, and cost are important factors in the decision.

Before beginning the refinishing process, it is a good idea to remove all of the cabinet doors and hardware. This can help make the application process smoother and prevent drips. It is also a good idea to strip the cabinets before painting or staining, and to use quality paint brushes. Cheaper brushes often have limp bristles and can lead to uneven applications.

After the cabinets have been stripped, they should be sanded to eliminate any rough patches. It is also a good idea to patch any holes or scratches before applying the final product. Then, the refinisher should apply wood filler and allow it to dry. Finally, the sanded surfaces should be lightly sprayed with a sealer to protect them from water and other stains.

Once the surface is sanded and primed, it is time to apply the first coat of paint. This should be done using a mini roller to minimize brush marks. Once the paint has dried, it is a good idea to lightly sand again before applying the second coat. It is important to note that if you are using a water-based product, it will not be as durable as an epoxy. In order to ensure the longevity of your finish, it is a good idea to use a product that has been KCMA tested.

A cabinet refacing project requires a lot of preparation and time, but it is worth it to achieve the desired results. The finished product will be beautiful and functional, making it a valuable addition to any home. It is a good idea to work with a professional who can guide you through the process and ensure that all of the details are addressed.

After the cabinet refinishing process is complete, it is a good idea to replace the hardware. This will give the kitchen a new look and feel. You can opt for brushed metal finishes such as nickel or pewter, which will complement any style of kitchen.

Safety

Cabinet refinishing is an easy way to change the look of your cabinets. It is a cost-effective alternative to replacing them, and it also extends the life of your cabinets. However, it is a dangerous job that requires professional training and equipment. It is important to take the proper safety precautions when refinishing your cabinets. For example, wear dust masks and eye protection when sanding, and use a powerful vacuum cleaner to remove the resulting dust from the workspace. You should also make sure to open any nearby windows and turn on a fan to reduce the risk of inhaling dust particles or hazardous fumes.

When it comes to painting your cabinets, you should choose a high-quality acrylic latex paint for the best results. It will resist stains and moisture better than other types of paints, and it will be durable enough to withstand everyday wear and tear. You can apply the paint with a foam roller or brush, and you can even use spray application. Be sure to let each coat dry thoroughly before applying another.

It’s a good idea to test your finish on an inconspicuous area of the cabinets before applying it. This will help you determine whether it will look good on your cabinets and ensure that you are happy with the color. Additionally, it will help you identify any areas that may need additional work, such as sanding or patching.

Traditional and DIY wood refinishing involves removing the existing finish, sanding the cabinet’s wooden surfaces to bare wood, and then applying a new finish. This is time-consuming, and it can damage the cabinet’s original components if not done properly. It can also be expensive, and it doesn’t address structural or functionality issues.

Cabinet refacing, on the other hand, is a more drastic and dramatic process that replaces the cabinet’s skins. It can be more expensive than refinishing, but it is an ideal option for addressing significant cosmetic problems. It also doesn’t require the removal of cabinet doors and drawer fronts, making it less labor-intensive than other options.

Kitchen Renovation – Choosing the Right Kitchen Cabinets, Countertops and Lighting

The kitchen is the most malleable space in a home, making it an ideal place to experiment with style and design.

Kitchen Renovation

Full renovations can include dropping walls, re-routing plumbing lines and controlled demolition — typically requiring professional architectural services and a licensed general contractor. Keep reading the article below to learn more about Kitchen Renovation.

Many homeowners live in condos, co-ops or HOAs that require a board approval process for all renovation projects. Prepare for your project ahead of time by familiarizing yourself with your building’s rules and regulations.

Cabinets are one of the last components installed during a kitchen renovation. Once the new wall texture and paint are in place, the cabinets are mounted to the walls and the installers can complete their work. Cabinets are often the most expensive part of a kitchen remodel, but can make a dramatic impact on the overall look of a room.

During the design process, homeowners should consider their storage needs and unique lifestyles when selecting cabinet styles and finishes. While the right color and door style may reflect a homeowner’s personal aesthetic, the functionality of a cabinet is equally important. Cabinets should have the ability to store and organize cookware, utensils, dishware, bottled hygienic products, and other household necessities efficiently.

When choosing a cabinet material, homeowners should consider durability, cost, and ease of maintenance. Wood is a popular option for cabinetry because it offers strength and beauty in addition to traditional warmth. Oak, maple, hickory, cherry, alder and exotic hardwoods are all good choices. Wood laminates, made of resin combined with paper, are a budget-friendly alternative to solid wood cabinetry. They offer a wide variety of colors, designs, and patterns that can be sealed to protect them from moisture and heat damage.

A home’s existing cabinets can be refinished to update the look of the kitchen, but sometimes a full cabinet replacement is needed. It’s important to have a design professional assess the cabinets and their fit in a room before making any final decisions. A professional will be able to help the homeowner navigate cabinet options and determine which type of finish or color will be most effective for the space. They’ll also help the homeowner select a new cabinet design to create a functional, organized kitchen with clean lines and crisp reveals.

Countertops

Countertops are the workhorses of your kitchen, so they need to be durable and match your aesthetic. There are a wide variety of both natural and manufactured countertop materials available, and some have become more popular than others.

Granite countertops continue to be the top choice for homeowners, offering a high-end look that adds value to your home. However, it can be a bit more maintenance-intensive than quartz, as it requires you to wipe up spills quickly and regularly, and follow a regular sealing schedule (typically once a year).

Manufactured countertop materials like quartz have gained popularity in recent years, as they offer a sleek and elegant style that matches many home aesthetics. A winner of the 2023 GH Home Renovation Award, quartz is highly durable and resists heat, scratches, and stains—making it a great choice for busy kitchens.

Wood or butcher-block countertops are an option that can warm up even the smallest of kitchens and offer a natural, traditional look. However, they can be more susceptible to stains and need to be treated regularly to protect the finish from moisture.

Laminate counters are affordable, simple to install, and come in a wide range of looks. While they don’t add resale value to your home and can be more difficult to maintain than other, higher-end options, they are a good choice for budget-minded renovations or for projects like rental property kitchens.

A countertop fabricator can create custom shapes and inlays to provide a unique design element, and they can also help you find the perfect color and pattern for your countertop. Lighting is important, too, and you can use recessed ceiling fixtures, pendants over islands, or under-cabinet lighting to brighten your workspaces.

Flooring

Flooring is an important part of any kitchen design. It should be durable, comfortable and match the style of your home. You want to find a material that will hold up well to foot traffic and heavy furniture, and can withstand spills and moisture. It’s also important that the flooring you choose is easy to maintain.

Many homeowners like to install hardwood floors in their kitchens. These beautiful floors are a timeless choice that can be refinished to match any home décor. However, wood floors are not as water-resistant as other kitchen floor options. For a durable alternative to traditional wood floors, consider engineered or bamboo floors. These sustainable flooring options offer the durability of wood at a lower price point and are more resistant to water damage.

Another durable option for kitchens is vinyl. This manmade material is stain-resistant and very easy to clean. It’s also one of the most budget-friendly and DIY-friendly types of kitchen flooring. However, vinyl is softer than other flooring materials and can be dented by heavy furniture.

Another popular kitchen flooring material is cork. This eco-friendly flooring option is softer than vinyl and can be refinished to restore its appearance. It is also water-resistant and helps absorb sound. However, cork can be slippery when wet and is not as durable as other flooring materials. Some homeowners opt for cork tiles, which can be snapped together or glued down to form a solid surface.

Appliances

Whether you’re ready to splurge or planning to remodel on a budget, appliances are often the biggest expense in any kitchen renovation. They represent between 15% and 20% of the total project cost, according to nationwide appliance retailer Appliances Connection. This is where a clear vision of your kitchen’s function and layout can help you narrow down the list of available choices.

Ideally, your new kitchen will be equipped with the functional features that match your lifestyle and cooking habits. The big decisions here include the type of cooktop you want (gas, electric, or induction), refrigerator size and style, and dishwasher brand and model.

Once you have a plan, it’s time to determine your budget and start researching options. Once you know how much to spend on your new kitchen, you can prioritize must-haves versus nice-to-haves. This is the time to think creatively and dream big. Maybe you’ll add a second sink or upgrade to a decorative range hood? Maybe you’ll even move a wall?

While it’s okay to dream, be careful not to over-customize your kitchen. Features and design styles that are highly specific may limit your future home-buying audience. This is one area where it’s helpful to talk to a knowledgeable kitchen designer before you make any final decisions.

Lastly, don’t forget about lighting. Fixtures that illuminate not only the workspace but also food prep areas will help you achieve both a functional and attractive kitchen. This is another area where a designer can help you find fixtures that balance form with function.

Lighting

The lighting of a kitchen can make or break the overall look and feel of the space. Choosing the right light fixtures can help create an inviting atmosphere for family and friends to gather. Adding different types of lighting, such as ambient and accent, can increase the functionality and enhance the aesthetics of the space.

The first step in selecting the proper light fixture is determining how much light the space needs and what type of look you’re going for. Thoroughly measuring the room will help you understand how big (or small) a light fixture can be without overpowering it. It’s also important to consider the style and color of the kitchen, as well as the surrounding rooms, to create a cohesive and pleasing look.

Ambient lighting is typically achieved through ceiling lights, but it can also be accomplished by hanging pendants or recessed fixtures. This provides the general illumination for the space and gives off a soft glow that helps to create a comfortable and welcoming atmosphere.

Task lighting, often accomplished through under-cabinet and pendant lights over counters, is used to illuminate specific areas where tasks like cooking and cleaning are done. This ensures that the workspace is properly lit to prevent accidents and improve efficiency.

Accent lighting is a great way to highlight decorative elements in the kitchen, such as a beautiful painting or a decorative hood fan. These can add a nice pop of visual interest to the kitchen and are commonly accomplished through recessed fixtures that are adjustable so they can be focused precisely on the desired element.

If you’re looking for a more energy-efficient way to brighten your kitchen, upgrading to LED bulbs can save you a lot of money in the long run. They use less energy than traditional incandescent bulbs and last longer, reducing the frequency of bulb replacements.

The Benefits of Roof Cleaning

Roof Cleaning Sarasota removes algae, mildew, moss, and oxidation from the surface of a roof. It can prolong the life span of your shingles and enhance your home’s curb appeal.

It is important to perform regular roof cleanings to prevent damage and keep your home in good condition. A dirty roof can lead to costly repairs and water damage.

It’s not uncommon to see a home covered in algae or moss on the block, but these substances are more than just an eyesore. If they aren’t removed, they can kill shingles and lead to rot and leaks in the roof and the home’s foundation. Fortunately, moss and algae are relatively easy to remove with the right cleaning products and a few preventative measures.

For the best results, spray on the mossy areas using a 50/50 combination of laundry-strength liquid chlorine bleach and water. Allow the solution to sit for 30 minutes or more, then rinse thoroughly with low-pressure water. Avoid spraying other plants and walkways with this mixture, as it can also kill them. For a natural alternative, substitute vinegar for bleach. This method is effective for killing moss but doesn’t fully remove it, so it is still recommended to clean your roof once or twice per year to keep the spores from growing and spreading.

If you’re comfortable working on a ladder, remove loose moss with a long-handled scrub brush. Work slowly and carefully to avoid lifting shingles, and work on one section at a time. When done properly, a good scrubbing will leave the moss completely dead and should not damage your roof’s materials. For areas that are difficult to reach, hire a professional for the best results.

Moss growth is bad for shingles because it holds moisture that can deteriorate the material and shorten the lifespan of your shingle roof. If left unattended, moss can also lead to a leaking roof and cause wood rot in the attic and walls of your home.

To help prevent moss from growing, cut back trees that are shading the roof and consider using algae-resistant shingles when replacing your roof. These shingles contain copper granules that inhibit the growth of algae but do not stop moss altogether. They are typically more expensive than standard shingles, but can save you money in the long run by deterring moss and other forms of algae from growing on your roof. This is an inexpensive way to protect your home’s value and your family’s health.

Dirt and Debris Removal

Your roof protects your home from the elements, so it naturally accumulates dirt and debris over time. If you ignore this accumulation, it can damage the shingles and underlying structure of your roof, reducing its lifespan. Regular roof cleaning helps to prevent this damage and maintain your roof’s insulating properties.

Debris also traps water against the shingles, which can damage and weaken them. It is especially important to remove large debris like branches and leaves from your roof. These can cause leaks and staining, and they can also block gutters.

During roof cleaning, debris can be swept or blown away with a leaf blower and removed from the roof with a broom. You may also wish to clean out your gutters, as it is easy for rainwater to get trapped there and create a breeding ground for mold and algae.

Before beginning a roof cleaning project, it is essential to inspect the roof carefully for any structural issues that need attention. Identifying these problems beforehand will help to ensure that the cleaning process does not cause further damage. It is also important to prepare the area for cleaning by removing any loose debris and covering any plants and landscaping with plastic sheeting (to prevent runoff from the cleaners).

If you plan on using chemicals to remove stains or growth, it’s a good idea to wear protective clothing to minimize your exposure to the cleaning agents. This includes long-sleeved shirts and pants, a face mask, and nonslip shoes with strong traction. It is also a good idea to keep first aid supplies close by in case anyone gets injured during the cleaning process.

Begin the cleaning process by lightly hosing down the roof surface to avoid dislodging or damaging shingles. Then, begin applying the cleaner according to the manufacturer’s instructions. Be sure to work in small sections and rinse the roof thoroughly afterward to remove any loosened debris. Once the cleaning process is complete, check the shingles and gutters for any signs of damage or debris. If necessary, replace any damaged or missing shingles.

Prevents Water Damage

A dirty roof isn’t just an eyesore, it can also lead to water damage in your home. Moss, algae, and dirt build up on the surface of the roof, trapping moisture against the shingles. Over time, this leads to rot and leaks. Water infiltration is one of the most serious issues homeowners face, and it can cause damage to floors, walls, ceilings, and other structural components. Regular roof cleaning can reduce the likelihood of water damage and keep your home safe from costly repairs.

Keeping the shingles free of moss, algae, and dirt prevents them from deteriorating quickly. A clean, well-maintained roof can last longer and increase the value of your home. The moss, algae, and dirt that builds up on the roof are also an attractant for pests, including birds, squirrels, and raccoons. This can lead to infestations and other issues that can affect the health and safety of your family.

In addition, a dirty roof can cause clogged gutters, leading to water accumulation and other problems. Regular roof cleaning can remove debris like leaves, twigs, and dirt from the gutters and prevent them from clogging. This can protect the gutters and downspouts from damage and ensure that the roof can drain properly.

A professional roof cleaning company will inspect the roof before beginning the process. This will allow them to identify any damaged or missing tiles that need repair before cleaning. They’ll also use a low-pressure washing technique that won’t damage the roofing materials. After cleaning, they’ll rinse the entire roof with a garden hose to remove all traces of the cleaning solution and debris. They’ll also check the gutters and downspouts for clogs and other issues that could cause problems. Finally, they’ll make sure the area around the roof is protected and fenced in to prevent any debris from falling during the cleaning process. This will prevent plants, animals, and people from getting hurt during the cleaning process.

Increases Home Value

When it comes time to sell your home, a clean roof is one of the best ways to increase its value. Buyers will be more likely to take interest in a well-maintained property and may even be willing to pay more for it. In addition, a clean and well-maintained roof will also improve your curb appeal, which in turn will have an impact on the overall look of your home’s exterior.

Improves Aesthetic Uniformity

Moss, algae, dirt, and other contaminants can make your roof look patchy and discolored. As a result, your entire home’s aesthetic can become disjointed and unappealing. Regular cleaning removes these organisms and prevents their growth, ensuring that your roof has a uniform appearance and that all of the exterior components work together.

Enhances Curb Appeal

A dirty and stained roof gives potential buyers the impression that your home hasn’t been well-maintained. This can deter them from putting in an offer or can lead to lower offers than you might expect. Regular roof cleaning can avoid this and maintain your home’s value.

Extends Roof Lifespan

The lifespan of a roof can be dramatically reduced without proper maintenance and care. A lack of maintenance can cause the need for costly repairs or replacement, which will decrease your home’s resale value. Regular cleaning helps to extend a roof’s lifespan by preventing the buildup of harmful substances and maintaining the structural integrity of the shingles.

Reduces Energy Costs

Dirty shingles can absorb and then release heat, which raises cooling costs. In contrast, a clean roof will effectively reflect sunlight, keeping your home cool and reducing your utility bills. Salamander Softwash uses a gentle method of roof washing that’s safe for your home and the environment, so you can be sure your roof is being cleaned safely.

Homebuyers are often concerned about the condition of a roof. It’s on the short list of questions they ask when touring homes, and a bad roof can quickly turn them off of the property. A clean and well-maintained roof, on the other hand, shows that the homeowner has been proactive about its maintenance and can potentially save them a large amount of money on their own future energy costs.

Window Repair – Why You Shouldn’t Replacing Your Windows

Window Repair Naperville can be a cost-effective project, depending on the type and extent of the damage. For example, a rotting drip cap can be replaced by a do-it-yourselfer, as can broken latches on older windows.

Window Repair

If you notice moisture, dirt or cloudiness between the glass panes of an IGU (insulated glass unit), it’s time to replace them. Replacing the seal will restore their insulating power.

A crack in your window can compromise the safety and security of your home, and it may also disrupt the balance of insulating gas found within double- or triple-pane windows, which can increase your energy costs. The good news is that while a cracked window might seem like an unfixable problem, it is possible to make the glass whole again.

The first step is to identify the type of crack in your window. If it is caused by temperature stress, as from a large shift between the inside and outside of your house, you can try a do-it-yourself approach using packing tape, masking tape or even duct tape, which will help limit the transfer of heat and cold into or out of your home until you can get the problem resolved permanently.

If the crack is due to an impact, such as from a ball or flying stray object hitting the window, you will need to call a professional to replace the glass. However, even this is not an insurmountable task for a homeowner who has the right tools and knowledge.

Before you attempt to fix the crack, clean the surface thoroughly with dish soap and warm water or a cleaning solvent such as mineral spirits or acetone, depending on the material your window is made from. This ensures that the repair adhesive will adhere properly and make the window stronger.

Once the surface is clean, mix the epoxy or super glue as per the manufacturer’s instructions. Once it is mixed, use a putty knife to apply it over the cracked area, filling in the gap and smoothing out any bumps or dips. After the epoxy has cured, you can either use a razor blade or squirt a few drops of acetone onto a dry cloth rag to remove any excess epoxy that might have oozed out during the repair process. Allow the rest of the epoxy to cure for at least a day before cleaning again. If you are happy with the result, your new pane of glass will be secure and in-tact for years to come.

Temporary Fixes

A cracked window might seem minor, but it can quickly grow into a big problem. Addressing it early will save you money, hassle and stress down the road.

The easiest way to fix a broken window is to simply cover it with tape or plastic. This accomplishes two important tasks: it stabilizes the crack, and it seals up the area so air can’t escape or come in from outside.

If you can get to the damaged window without too much trouble, use a clear film or tape to cover the crack. This will keep out rain, snow and other weather elements until you can get a professional to replace your glass.

Another option is to use a putty or glazing compound designed for windows, and apply it directly over the crack. Be sure to thoroughly clean the surface, and apply generously – it may take more than one application. When the putty or compound is fully dry, scrape off any excess.

You can also try using clear nail polish to fill a small crack in your home window. This will create a stronger repair than either tape or film, but it won’t last very long if exposed to moisture and temperature changes.

Lastly, you can use heavy-duty double-layered plastic, like a trash bag, to temporarily cover the damaged window. This will keep out cold, wind and other weather elements until you can get whoever is coming to replace your broken window to stop by and board it up.

Ultimately, it is best to find a professional to repair or replace your broken windows. Attempting to handle this yourself can lead to further damage and cost you more in the long run, not to mention detract from your home’s aesthetic. While temporary fixes are cheap and easy, they will ultimately do more harm than good. So, don’t hesitate to call a reputable window replacement company to help you with your glass replacement. They’ll be able to help you determine the best solution for your specific situation, and provide the highest quality installation and customer service.

Repairing a Cracked Window

Whether you have a window that has sentimental value or one with architectural significance, it’s important to make sure it’s safe and sound before replacing it. There are several steps to fix a cracked window, from cleaning it and protecting the area around it to applying an epoxy and waiting for it to cure.

To clean your window, start by washing away any dirt or debris that has built up. This will help ensure that the repair adhesive sticks to the glass and makes it stronger. You can use a soapy solution on a rag and then wipe the surface to remove any residue from fingerprints, oil, or smudges. You’ll also need to protect the surrounding area with a piece of masking tape. This will prevent any accidental spills or smudges on the rest of the glass.

If your window is still cracked, you can try using a glass glue. This is a specialized glue that can bond the glass surfaces together and make it look less noticeable. Using this type of glue might be difficult for a beginner, but with some practice it can be easy enough to master.

Once you have mixed the epoxy resin, apply it to the crack using a putty knife. Be careful not to press too hard as this can cause the crack to widen further. You can also use a razor blade or acetone to scrape away any excess epoxy and leave the repaired area looking clean. Once the epoxy has cured, you can move on to sanding and painting it to match the rest of the frame.

If the crack in your window is a large one, you may need to replace it with a new pane. This will be much more expensive than simply repairing the old window, but it will ensure that your home is properly sealed and that no water or air can leak in or out. Before making this decision, consider asking a professional for advice. They will be able to recommend the best option for your home. They will be able to assess the damage and help you choose a replacement that will fit your budget and needs.

Replacement

The decision to replace windows isn’t always black and white. The condition of the glass, frame and seal should determine whether to repair or replace a window. But there are other factors to consider, as well.

Rotting frames are a clear sign that it’s time to look into replacement options. Even if the rotting is limited to just one or two small areas, it’s a good idea to start shopping around for new windows.

Foggy windows are another sign that it’s time to consider replacement. The problem is caused by a failed seal in your double- or triple-paned insulated glass unit (IGU), which allows moisture and condensation to make its way into the space between window panes. While you can try using defogging spray and ventilating your home, it’s likely that you’ll need to replace the IGU if these strategies don’t work.

It’s also a good idea to consider replacement if you notice excessive water infiltration around your windows. Not only is this a sign that your window casing is failing, it could indicate that the surrounding wall and insulation are in poor condition as well. In this case, it would be better to replace the entire window rather than attempt to repair it.

If you have a single-pane window with damaged muntins and mullions, it may be possible to have these rebuilt without needing to replace the entire window. Alternatively, you can opt to have them replaced with window inserts that fit into the existing frames.

The main consideration with these options is that you’ll have to remove the interior and exterior trim in order to install them, whereas full-frame replacement windows slide horizontally into existing openings. However, the latter method will allow you to upgrade your home’s design with new windows that offer superior energy efficiency and structural integrity. In fact, choosing the right replacement windows can actually help to increase your home’s value. Be sure to carefully research different brands to find the best ones available for your budget and needs. You can also check out some of the top-rated companies in your area to compare their customer service and product offerings.